EZYplant's Garden Bed Plans Are Designed To Make It Easy For You To Install.
Get it right the first time with Ezyplant!
With our step by step process, placing out your plants & any garden features or feature trees included in the garden bed plans you choose, is so easy...
The following steps will make laying out your garden bed design easy. Take your time placing out your plants and any garden features to ensure your final garden design is a great success.
Soil preparation may be required in some instances and will be the secret to your success. If you are unsure what type of soil you are working with then take a look at the article on our Hints & Tips page titled “‘Choosing the right plant selection for your soil type”. This article explains the different soil types and which plant selection works best with each but also what you can do to work your soil so you can grow almost anything.
We always recommend using quality garden products because if you don’t provide a good growing environment for your plants, they will suffer from disease, poor growth and in some instances die. Good quality soil, fertilizer and mulch will not only alleviate your ongoing maintenance, but it will guarantee your plants will thrive. Please do not use your lawn clippings as mulch, they inevitably accumulate and create a mat that dramatically reduces oxygen exchange & water absorption to the soil. Lawn clippings often include lawn seed too so you will end up with grass germinating, creating unnecessary maintenance.

Remember...
garden edging can be installed later but getting your plants in the ground will ensure they establish and start growing quickly. To make the process of marking out your garden bed area easier, consider purchasing some ground paint. This is available at your local hardware or paint shop and available in different colours.
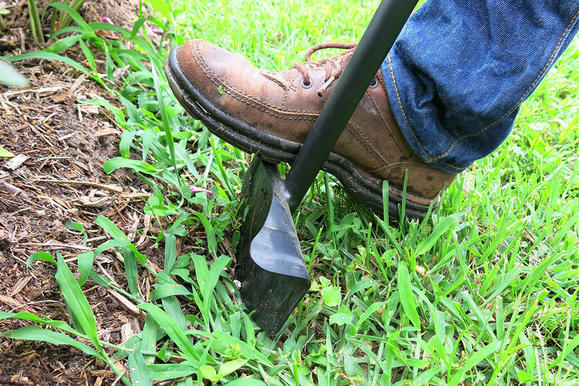
You can also use a piece of rope or even the garden hose to create the outline of the shape of the garden bed you have chosen. If garden edging is not being installed initially, then creating a “V” channel is a great solution. This will ensure the mulch is kept in the garden bed and your turf won’t grow into your gardens, as you will have a clean edge to trim with a line trimmer.
After marking out the perimeter of your garden bed, use a spade to cut an angled cut down into the ground to 3/4 of the depth of your spade head. Once you have made your way around the perimeter of the garden bed, step into the garden bed (facing out of the garden bed area) and at a space of about 10-15cm from your initial cut, start cutting an angled cut down to meet the bottom of your first cut. This will give you a “V” shaped piece of earth to remove which can be disposed of, mulched or used in the garden bed area to provide extra soil. Ensure any grass is removed from the soil you use to stop it growing and causing a maintenance issue.
Happy Planting.

Laying Out Your Garden Bed Plan.
Rectangular Garden Bed Plans
- If you need to apply your layout to more than the standard 6 metre length of garden bed, you will need to calculate how many additional plants will be required. Depending on the total length of your garden bed, you may find you will have to place your plants a little closer or a little further apart (through the line of planting) to create the look that your chosen plan was designed to give you. The following steps apply to a single line of plantings or a multi-tiered planting within a rectangle garden bed plan. Where you have chosen a garden bed plan with a single line of plants through the centre of the bed, then consider steps 1 – 3 placing your plants to the centre line of the garden bed.
1. If you have chosen a multi-tiered planted garden bed plan then start by placing one of the back line plants at each end of the garden bed, bringing them in from each end of the garden bed so the trunk or centre of the plant is placed as you see them in the plan. Ensure that you place them correctly within the width of the garden allowing the correct spacing for the next line of plantings to be placed in front of the back-line of plants.
2. Then place the plant/s in the middle of the garden bed, lining it/them up with the two end plants from the step before. Placing a string line or a piece of rope from end to end of the garden bed, as a guide for planting, ensures a straight line of plants and makes things a little bit easier for you.
3. Now find the centre of the two halves that you have created in the step above. Place the plant/s to the centre and then the remaining plants required until you have an evenly spaced back-line of plants.
4. Now plant the back line of plants.
5. Following the same steps from above, place the next line of plants and then plant them ensuring you don’t damage the plants already planted.
6. Your remaining plant selection can now be placed to the front edge of the garden bed, using the previous line of plants to assist in placement. Once you are happy with the final placement complete the planting.
7. Apply some slow release fertilizer (specific to your chosen plant selection) around the base of the plant as per the directions on your product.
8. Water all plants thoroughly before placing a 7cm layer of mulch on all bare soil ensuring you bring it back a little from the trunk of the plants to reduce the chance of a disease called Collar Rot.
Corner Garden Bed Plans
1. If your design includes a Water Feature/Statue/Birdbath, ensure its placement before you place the plants. This will make your planting a lot less stressful as you won’t have to worry about stepping on your new plants whilst manoeuvring your garden feature into position.
2. Follow Steps 1 – 6 (where applicable) from the above steps for laying out a Rectangle Garden Bed.
6. Apply some slow release fertilizer (specific to your chosen plant selection) around the base of the plant as per the directions on your product.
7. Water all plants thoroughly before placing a 7cm layer of mulch on all bare soil ensuring you bring it back a little from the trunk of the plants to reduce the chance of a disease called Collar Rot.
Feature Garden Bed Plans
1. Start by placing the feature tree, plant/s or garden feature to its position within the garden bed.
2. Once you are happy with the positioning of your feature plant/s, complete the planting of these before moving onto the next step.
3. All remaining plants can now be placed and planted. If you require further guidance read through the laying out of a Rectangle Garden Bed for qualification.
4. Apply some slow release fertilizer (specific to your chosen plant selection) around the base of the plant as per the directions on your product.
5. Water all plants thoroughly before placing a 7cm layer of mulch on all bare soil ensuring you bring it back a little from the trunk of the plant to reduce the chance of a disease called Collar Rot.
Should you require further instructions to install your garden bed plan, please don’t hesitate to contact us.
info@ezyplant.com.au
****This information sheet is only a guide and not intended to be comprehensive instructions.
Need some one on one advice?
Our Online Garden Consultation uses technology to ensure we can support you in your home,
no matter where you live in Australia. Contact Us today to arrange a time that suits you.
,

